On the right a Shinko 705 with 10k on it. On the left, a Shinko 705 that has only rolled across my garage floor. The Versys has new shoes. 😀
The Versys gets new shoes!
I can run faster and jump higher with these on!
We decided to purchase the Princess Auto motorcycle tire bead breaker, and the on sale, Dynamic tire balancer based on a review by a friend, so there was a flurry of seasonal tire changes completed in the garage this July.
Truth be told, I decided it was well past the time to replace my front tire on the Versys, and I opted to do it myself, so broke the bead with a series of wood clamps but it was a right PITA (pain in the arse) and when done, I tried to install balance beads and that too was an unholy mess until I learned the technique that worked to get the two ounces into the tire, but that valve stem was a terrible! It wouldn't take any air until I put the older valve core back in. I had bought a valve core removing tool, a few of them, but was I ever glad I did, as I had to cut mine in half to fit it under the paired brake disks, and it worked like a charm over sixteen times to seat and unseat that core! **Sigh.
I still had my rear tire on order and two more tires and tubes for Caroline's KLR, and when the tires arrived, we convinced ourselves that buying the Motorcycle Tire Changer with bead breaker for $89.99 Canadian was worth it. We ran into a mate Jayson from the Red Isle Riders, and I mentioned that the Motorcycle Wheel Balancing Stand was on sale this week, and he said he owned one, and it "Did alright." Good enough for me! We went in, and left Princess Auto lighter in the wallet than when we went in, but well armed with the motorcycle bead breaker and the tire balancer.
Assembling them was straight forward, and I used Caroline's 1/4" Ridgid impact driver along with blue loctite thread locker to assemble most of the two items. I could see that storing the bead breaker on a wall spike high in the garage was going to be perfectly acceptable when not in use, but I'd have to find a special home for the Wheel Balancer up and out of the way off of the shop floor. As the garage is also damp, I oiled everything that moved, and used anti seize paste on things that didn't like the hex lock nuts.
I'd been a bit lazy, for when my Versys let me down in the fall of last year, no longer charging the battery and leaving me high and dry at Gas's grocery store in New Haven Prince Edward Island, Caroline helped me collect it, and we stuck it into her garage, where it has sat on a battery tender over the winter.
There is a real danger of ice today It's 1C / 34F today! Brrrrr!
I'd pulled into Gas' and refilled with the engine off, and the trouble began when the motor failed to start after paying and grabbing a couple of things. The owner of the store loaned me a battery boost pack big enough to jump start a truck, so it had no problem boosting the Versys back to life, but try as I might, I could get no clear indication that the battery was charging, and when I pulled the pack off, the bike would die immediately. Caroline arrived with her Klein Digital Multimeter and I proved that the battery wasn't taking a charge conclusively, so returned the pack and made arrangements to leave the bike and pick it up the next day. **Sigh.
It was still September, so once we rolled the bike off the trailer and into Caroline's garage, I thought I'd have tons of time to repair it, but was truly dreading the cost, as a new stator and regulator could be over $1000 easily if you were buying OEM parts, but then along came Hurricane Fiona, the nasty beotch, and bikes were a thing of dreams for a bit there while we tried to put the island back together post storm. The the snow set in and there was always an excuse not to be outside freezing one's digits off. I finally got off my butt, read some online "How-To" material and decided I needed a definitive test of the bikes stator, but there is so much information on the topic that it becomes pretty overwhelming, and I may not have had the best meter in the world when I found that with the stator disconnected at the wiring harness plastic connector, a three wire, spade set up, that each leg of the stator was making more than 15VAC with respect to frame ground, and that increased as the revolutions went up.
Good, so electrically the stator was okay so the regulator rectifier must be to blame, right? WRONG!!! That stupid connector... one of the spades was "make or break" and that meant that the output to the battery was fine on two legs, but on the regulator rectifier side of the connector one of the legs was not making voltage at all, so it took a spade terminal and female terminal replacement to square it away in no time flat.
Excessive arcing caused be a "too loose" connector.
Darn it! I could have ridden well into Fall last year, but I'd mis diagnosed the problem and thought it was a much more expensive fix.
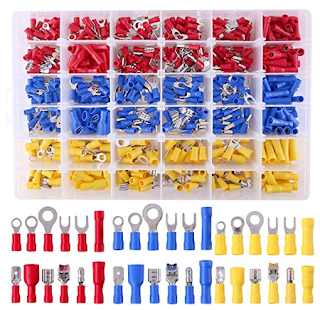
The red size is about all you will need for a Versys Unless you are dealing with battery cables :)
Well, procrastination works, and here I am riding it as a daily commuter while my Honda Civic gets it's yearly inspection and tune up by Nicholson's Garage in Darlington PEI where Eldred and Kevin are hard at work trying to keep that old machine on the road so I have a sled for those snowy days when you need four wheels on the ground.
While my friends in Ontario have been camping already, I'm old enough and smart enough to wait for warmer weather for that, plus I still have to redo my fork seals and brake pads up front as well. On a bike that is now fourteen years old, you have to expect a few wee problems here and there, don't you?
Shiny side up!!!
UPDATE: 2023-09-16
It was worse than I thought, and the bike ran okay for a bit, but I lost the use of my headlight, changed out the bulb to find out it was the relay not "latching" on due to insufficient battery/stator output. Much later that summer I had to ask my girlfriend to trailer my dead bike back to the apartment, where I put it on a charge, and ordered in a battery from Bolger Motorsports, the Kawi dealer. It wasn't the battery. I needed to bite the bullet and order in a new Stator, and Regulator/Rectifier (heavy duty Mosfet version this time) that got installed first weekend in September.) So after a new "Trifecta" of electrical parts, the bike is running well and I can now pull over and kill the engine knowing that the AGM battery is going to have the juice to start the bike, and power my heated grips, high beams, and heated jacket, or charge a battery bank for moto camping later on that day. Win win but it exhausted my wallet, and cost me a planned trip to visit family in September, sadly. But having a reliable scoot back under me is a true joy, and I mean to get the most use I can out of it before the end of the riding season, which for me will be when it snows and sticks around with night time temps below zero, and daytime highs of less than 4 degrees Celsius.
CLine was insanely envious of the Brake Light Flasher that I installed onto my Versys back in 2013. When I apply my brakes, a clever bit of electrickery strobes my brake light three times quickly, then goes on full solid, to alert motorists behind me that I'm about to do something (stupid? unique? entertaining?). The idea is it attracts their attention much better than simply oscillating between an always on run light and extra bright indicating the vehicle ahead is slowing down.
The GS-100A Strobe Controller for LED Stoplight
CLine and I were talking about the legalities of the devices, and I told her that if anyone comes up to her and objects she should say... (She interrupted me at this point)
"It got your attention, didn't it?"
I really couldn't argue with that, and it was ever so eloquent when compared to the diatribe I was about to launch into. It is supposed to enhance a riders safety, as the only thing we have back there to let folks know what is going on are three small indicators, one of which protects your life by alerting people behind you, but it is usually smaller in size than a softball. Anyhow, I've put over 200,000 kilometres on various bikes that mount them and have not once been questioned by law enforcement nor border/customs officials.
ICBM abandoned wilhe-nilhe on the road
Right, I'd managed to scotch our plans for a ride last Saturday by sending an Inter Continental Ballistic Missile ICBM through my rear tire while out on a ride on Thursday night around Canoe Cove, and as my tire was flat, useless and the glue on the plug was still wet, we opted to head over to Caroline's place and get started on the installation of the GS-100A Strobe Controller for LED Stoplight that she has had for a couple of weeks now, as she finally had all the bits and pieces she wanted to make it happen.
There are a ton of installation How-Tos on the interwebs, so I'm not going to steal their thunder, suffice to say that I'll try to give you some model specific details for a 2004 Honda Shadow.
CAUTION!!! Some viewers may find the following images of a well ridden, dirty, adventure wanna be Honda Shadow disturbing or offensive. Those offended may want to ensure they are comfortably seated, have their pacifier/soother along with a blindfold close to hand, and a Sharon, Lois & Bram recording ready to play. Or as Caroline puts it "sorry not sorry for the filthiness of my bike".
Why doesn't she keep it clean and safely parked in the garage with the polish rags!?
1. You will want to have the drivers seat off so you can access the three connectors protected by a rubber sleeve that rests on top of the battery cover top thingy.
2. Locate the one with three conductors using a white plastic connector. The three wire colours are:
brown
green
green with yellow stripe.
3. On the male portion of the connector whose wires head towards the rear of the motorcycle, Cut two of the wires leaving enough room at the connector to solder or splice in the future. I would leave minimum 3/4" at the connector side. You want to cut the green and the green-yellow stripe. Leave the brown run light untouched.
NOTE: My friend Jeff advocates purchasing identical harness connectors so the bike can be put back to stock easily for sale or for inspection if needed. "...I cut nothing.. always make or buy adapters to plug in and go back to the way it was."
Update:
I've since seen a diagram where the installer cut only one of the wires, and simply connected the other wire in parallel. I've added this below for your reference. It's always a good idea NOT to cut unnecessary wiring if you can manage it.
This installer simply connected the grounds in parallel The black wires are all connected (tapped) onto the green ground wire of the bike GS-100A Wiring Diagram
4. For reference, the wiring diagram breaks it out as follows:
Green = frame ground
Brown = run light (always on) 12V
Green-Yellow = Brake light (only on when brakes applied) 12V
5. Orient your GS-100A correctly, and connect the "IN" side to the forward part of the motorcycle, and the "OUT" to the wires continuing on to the back of the motorcycle. My girlfriend opted to use bullet connectors to do this, the idea being that if the module failed, she could simply remove it and plug the harness back together. Ensure your finished cable and module are routed UNDER the frame rail and not OVER TOP of it.
6. I encourage you to "do a tug test" on each of your connections. You would rather see a poor connection fail in the driveway as opposed to one the highway one dark and stormy night.
7. Prevent water ingress by using electrical tape over the end of the manufactured insulation. Wrap this as tightly as you can manage.
Note that we disconnected the strobe and rerouted the cable after our testing, then tested again once it was secured to the frame rails out of the way of contact with the seat.
And now, for your enjoyment, a video showing the completed job. Caroline replaced her analogue 1157 bulb with an LED one that she purchased on Amazon.ca, so her bulb appears quite bright in this video. Your mileage may vary.
The GS-100A will apparently work with both analogue AND LED bulbs, but the pattern changes a touch as the analogue bulbs can't respond to the quick flash voltage spikes the same way.
This video by Gary Rowe highlights the differences you might expect to see:
Conclusion:
Caroline has been riding with the brake flasher for almost a week now, although has only gone out on a few rides. Some observations of mine:
Try to engage the brakes for a three second or longer period as opposed to "blipping" them on and off. Not only is it a good habit to get into, drivers won't shout out that "Your brake light is broken!" when you get to the stop lights. If you are in the habit of a brief touch now and then, all we will see behind you is your brake light madly flashing away unless you hold the switch activated a tad longer.
It really does work to improve visibility, as I have a tendency to ride a bit too close to Caroline when following her, and she used to catch me by surprise with braking once in a while, but it's got me backing off a bit more which is a good thing. In my own experience, I note that some drivers leave me more room behind the bike as well. Not always, but the difference has been noticeable.
What have you done to make your ride safer this season?
Update:
I installed one of these on my Versys over the weekend as I had the bike up on blocks for the stator which I fixed fairly quickly, a defective connector being the culprit, and as I'd a wee 3rd Brake Flasher that I'd bought used from an old KLR rider that sold me some spare parts, and it had finally given up after seven or eight years on the bike. Seeline had gifted me with one that she'd bought from Amazon, and it was past time to get it installed and feel a bit safer with all that traffic around me. I used to ride in downtown Toronto traffic on my motorcycle, and this is one the tools that I advocate wholeheartedly for use, the brake light strobe function is going to alert drivers that something is going to happen. Your job is now simply to hold down the brake lever long enough so it doesn't just flash at them, but flashes then goes steady, a simple thing to do with one fingers pressure. One the Versys installation was even easier as there is a big frame ground bolt where I was able to pigtail my grounds and attach both to the ground there, and as I'd already had the wire sorted for the Versys, I just used some spade connectors from Seeline's terminal kit and crimped on something quick and easy. Done like dinner.
My maintenance records say that the last set of Shinko 705s I mounted was last fall after coming back from Quebec with some bubbling on the 170 rear. After our last jaunt to Saint Martin's New Brunswick, the bike was telling me it was due for replacement as the rear tire no longer was tracking perfectly with the front, probably because I'd worn a nice flat spot down the center, and the tread on the shoulders was not perfectly flat, but bulged here and there, so it made fast cornering rather more interesting than I care for, a bit greasy in fact, and when I laid her over a bit, it slipped out in some gravel and I thought I was going to have to change both the rear tire and my shorts, not necessarily in that order.
10,000 km on the Shinko 705 tire
My colleague Daine with my order from FortNine.ca
I've been having some second thoughts about riding on the 705 series, as my girlfriend rides a Honda Shadow cruiser, and does quite well following me down the dirt and clay roads, so in theory if I were to adopt a more road oriented tire, I'd get less vibration and a larger contact patch for cornering, but if you recall when I picked up that nail about 6,000 kilometres ago in my rear tire, I bought a new 170 Shinko 705 just in case, so it only made sense to match it with a 120 front to end out the season with our two week 5,000 kilometer ride to Ontario and back.
Rock Straps are a win to get this tire home.
This shot clearly shows some of the uneven wear that is happening, and I think the tire could have lost it's balance as it was wearing unevenly around it's circumference.
Now that the rims had to come off at last, it was time to catch up on a bit more maintenance:
Oil & Filter change
New EBC brake pads all around
Cable and lock lubrication
Pitbull stands make this job a whole lot easier!
Now that the new rubber has been mounted, it was time to hit the road and head to Montague for the Red Isle Riders bike night!
Yep. I'd completely gone and snapped off my sidestand. It's tough to see from this angle, but my bike is loaded down for touring with givi cases and a tent strapped across the back seat, and earlier at the racetrack I'd snapped the bugger clean off near the attachment point on the frame.
Caroline has some fun with it
There was no choice but to toss it and the spring into my top box, and choose nice parking spots on my way back to Prince Edward Island where I posted on facebook that I'd trashed it, and my friend Ib Ra Him suggested that I try to get it welded...
Yeah, guess who is a bit cheesed off today?
Nothing is missing precisely...
Bingo!!! I chatted with my nephew Ryan and set up a meeting with him at 3 pm that afternoon...
Ryan cleans up the mating surfaces
And we head on up the garage where he uses the light duty MIG welder to tack it together, but with metal that thin, he shot a couples of holes into it, and had to be careful to build them back up and close them.
"That'll work until it doesn't."
Warranted until the door hits your heels on the way out.
With a rattle can, I was able to pretty it up a touch, and now it looks better than when it was on the bike last week.
Okay, I was hoping for less excitement during installation, but here is what happened... I bolted the sidestand back on, and used the thin locking nut to make sure it was going to stay there. THEN I tried to hook the spring over the sidestand, but with only one person and a pair of needle nose pliers it was just too much and I had to admit defeat.
Once more I turned to the Kawasaki Versys Club on Facebook for answers, and one gent said he simply hooked the spring first, then levered in the bolt. Okay, I gave that a good college try and managed to bugger the internal thread of the kickstand. Not his fault, it was mine and I tried to clean it up with a file, but it really needed a tap to clean out the damaged portion of the kickstand. Darn it. I needed to source a metric tap, but mine was thirty minutes drive away and I had no clue if I had the correct size, as it was weighted far more to the SAE side of threads, so I had no idea if it was going to work at all! I had my doubts.
Caroline and I were supposed to join a party for lunch in Victoria by the sea at the Lobster Barn there on the wharf around 1100, so I was eager to head to Shane Bolgers to pick up my bolt for the lower engine mount that was in the shop waiting for collection(Don't ask) and ask them if they had a tap that would ream this puppy out and maybe clean up the bolt as well.